24.4 x 17 x 2.6 cm
I've been making so many serious books lately. I wanted to have some fun with this one.
I used Kaskad paper from Hewit's. The sheets were quite large (64 x 46 cm), so I creased and tore them into quarters. I wanted deckle edges on the paper, so I wasn't too finicky if the tears went a little crooked.
Then the fun started. I aged the paper, using techniques I saw on a TV program about art forgery. First, I soaked it in tea. Then I hung it to dry for a bit, while I prepared my materials for the "fox marks". Using the back of a spoon, I ground up some instant coffee to a fine powder. I then sprinkled it lightly through a tea strainer onto the still-damp papers and stacked them up (so facing pages had matching fox marks). After they dried, I used a steam iron to iron the pages flatter without removing much of the cockling.
Collating and sewing the book went much as usual; I sewed it on five double exterior cords. After rounding and backing it as usual, and attaching a suede thong as a bookmark, I was ready to make the headbands.
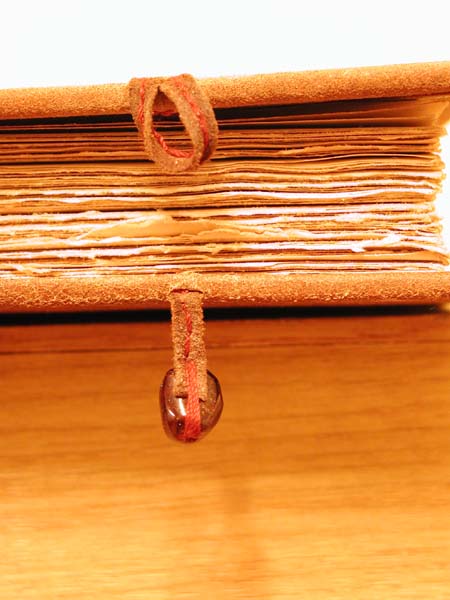
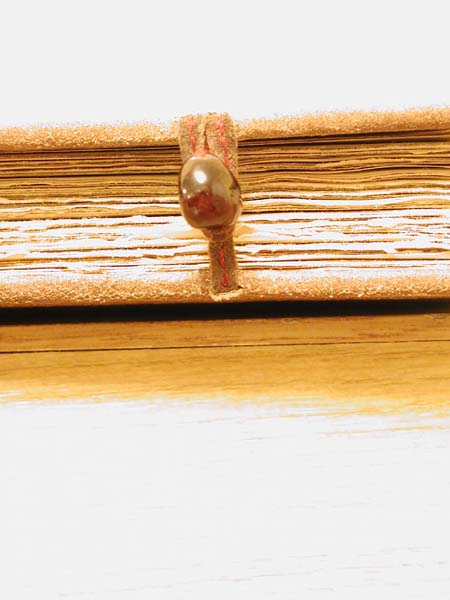
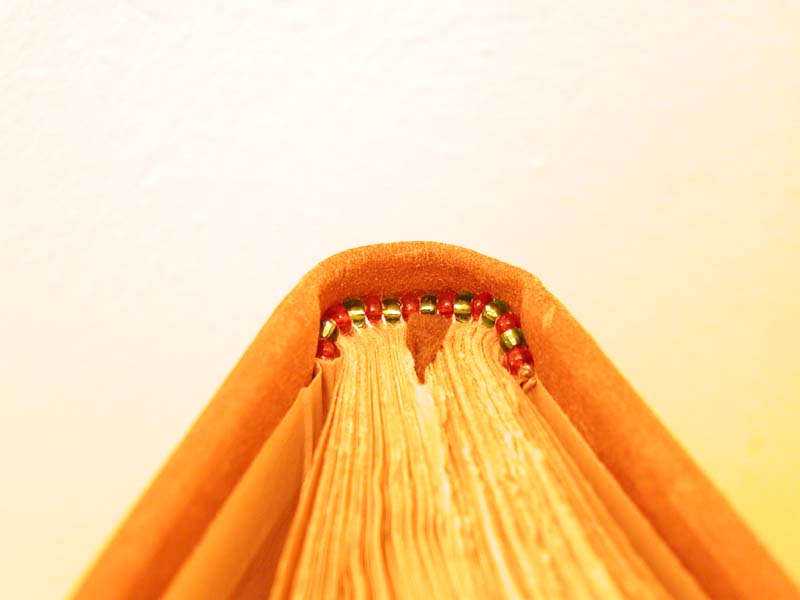 Rather than the usual thread headbands, I decided to use small beads. I obtained some fine plastic-coated beading wire and tied a knot in it about an inch from the end. I then threaded the other side of the wire with beads in alternating colors until they made up the circumference of the spine, and tied another knot as close to the beads as I could get it. Once I cut the wire off about an inch from the second knot, I had my headband.
Then it was just a case of sewing the bead strip to the book. Using plain linen thread, I stitched it into the signatures through the kettlestitch holes. The thread ran over the wire between two beads, through the signature, then up diagonally to the next space between the beads. I drew it tight enough that the beads just rested on the head of the book. Then I tucked the loose ends of the wires in among the stiches along the spine of the book.
I padded the back of the book block with kraft paper, and sanded it down to hide the irregularities caused by my headbanding. Then I laced in some cardboard covers.
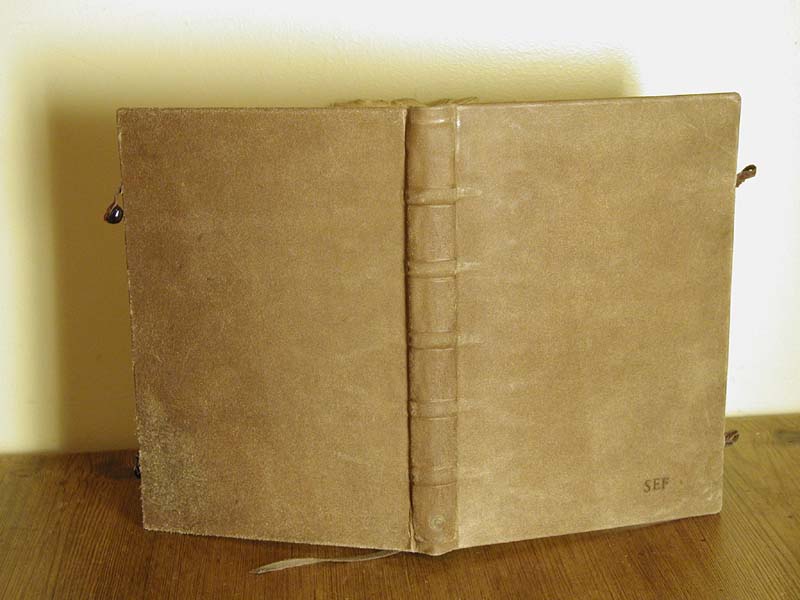 The next interesting choice was the cover material. I had planned to use an undyed basil goatskin, which was a very light cream. But while turning through my leather collection, I caught a glimpse of the back side of a dark brown goat hide. The front was highly glazed (almost too much so), but the back was nicely rough. I wasn't sure whether the glazed surface would take the adhesive, so I shaved it off before covering the book.
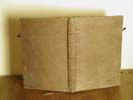
 The cockled pages meant that the book didn't quite close flat. So another step before covering the book was to lace some thongs into the fore edges of the boards to make clasps. The front covers were given loops and the back covers simple straps. When I started attaching the covering leather to the book, I made sure to cut slits in the fore edges to slip the thongs through.
Covering the book was pretty much as normal, apart from the thong holes. I filled in the area between the leather turn-ins with card, then glued the outer pages of the book block down to serve as endpapers. I blind tooled my mother's initials into the front cover, and put the rooster mark on the lower spine as usual.
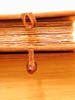
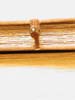
Then the only challenge was the clasps. I had a couple of pieces of garnet to use as toggles, which I sewed onto the straps coming out of the back cover. Because the suede straps didn't impress me with their tensile strength, I actually anchored the garnets to the cover material with a chain of stiches in red thread. Then I stiched the loops on the front covers to match.
I loved this effect. I will have to work on techniques to prevent cockling, if I want a slightly less rough-looking book block. Also, I would love to learn how to darken the edges of the pages more than the middle, for a more authentic look.
(Note that this is very much not archivally sound behavior - do it at your own risk!
These worked really, really well, and looked good. They don't add structural strength to the book like sewn ones would, but for a book like this, that is unlikely to be a problem through the centuries. I may use a slip of vellum in the leather just behind the headband in future, because the wire tended to poke out when the book was covered.
Addendum, September 28, 2003: I've found a better way to do beaded headbands. Simpler, easier to tension correctly, with less spine bulge.
This came out really well. The only quibble is that one corner of the book had a bit of the hide too close to the edge, where the texture didn't match the rest. In future, I think I will cut reversed hides from the middle of the skin.
Again, something I will use again. The only problem with the toggles was that they were fiddly to fasten. In future, maybe I will use a longer loop and attach the bead directly to the board, or put the loop on the back cover and the bead strap on the front.