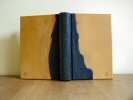
11.5 x 15.3 x 2.5 cm
Springback book of cream laid paper, with leather-jointed paste paper endsheets. Spine covered in green goatskin over- and under-laid with golden bookcalf. Blind tooling.
This book, like the pale book, the traditional half-binding and the golden springback, is the remnant of an abandoned experiment in endpaper structures. The book blocks came in handy when I decided to explore the tradition of springback bindings.
(For more information on springback books, go to the golden springback binding notes. I won't duplicate the history here. I want to talk about the "subduction" process.)
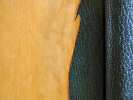
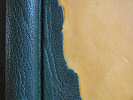
| Back cover: calf over goat |  |
 |
Front cover: goat over calf |
The real innovation on this book was in the covering, though it was not entirely a success. It comes from my dissatisfaction at the ways I know of joining two pieces of leather.
When joining two straight-edged pieces on a book cover, one can either abut them or do a a certain amount of paring and over and underlay them. In theory, one can do the same with curved or irregularly shaped pieces, but that requires a much finer touch than I have. I tend to abut, which leaves the risk of gaps.
But the things I want to join are particularly troublesome. You see, I love the shapes that the edges of hides get into, as the three-dimensionality of goat or calf turns into the two-dimensionality of leather. The marks of the clips and hooks that help handle the skins as they are stretched and dyed add even more interest. But these edge pieces are so intricate, and often so stiff and coarse, that ordinary processes are almost too much trouble.
My solution is derived from back-pared onlays, which are another miraculous solution to an incredibly fiddly problem. Instead of a full onlay, why not do back-pared subduction? (my earthquake-aware Californian background is showing). Here's what I did:
Although I tested the adhesive and leathers for surface damage, I didn't check colorfastness. It appears, based on the staining, that the PVA wicked some green dye from the goatskin onto the bookcalf. This may further limit the leathers that are suitable for this technique.
Another problem was the way in which the stabilising paper came off during the covering process. Since the PVA was water-soluble (well, technically, water-reversible), the rice paper covering the joins began to come off in sticky, soggy clumps when the leather was wet with paste. And once it did start to come off, I had to remove as much of it as I could, or the remaining paper would have left dents after drying under light pressure. And leather covering is a fiddly process at the best of times - having to do it with PVA-sticky fingers, or take the time to wash my hands repeatedly, made it even worse.
The paste holding onlay and underlay together did fail at one point on the covers, and without the stabilising layer, the structure would have come apart. So the paper was of use.
I will have to do more of them. I would particularly like to try the technique where the spring is built up of layers all the same size (leading to sloped grooves) rather than of layers measured one by one (leading to straight edged grooves, but taking ages).