| Go to Site Map | ||

|
|

|
|
Click on a ribbon to follow a specific book |
||
| Go to Site Map | ||
|
|
|
|
|
Click on a ribbon to follow a specific book |
||
This step was performed on the blue book.
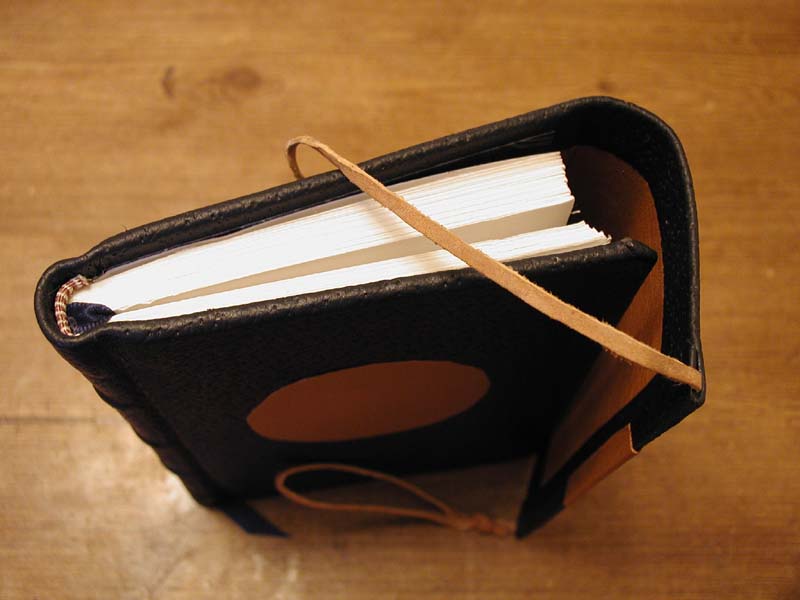 Covering the blue book was a challenge. I wanted all three books to be distinctive, and I already had some interesting ideas for the red and green books. When it came to the blue, I drew a blank. My blue leather is embossed with a complex pattern, which makes it hard to embellish any further. But leaving the book plain dark blue didn't seem the solution either. A novel shape seemed the best solution. I settled on an envelope cover, where a flap of the back cover wraps around to the front and ties in place.
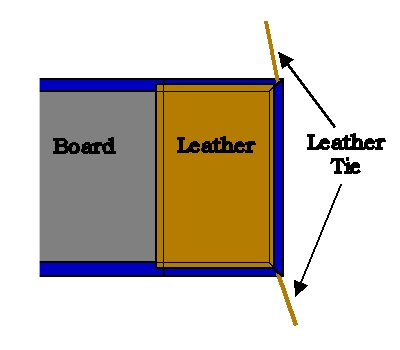
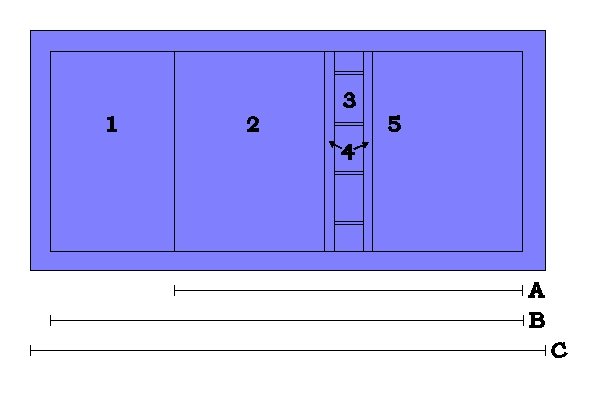 This required me to cut the leather larger than the cardboard and rice paper skeleton I made in the previous step. On the diagram to the left, A is the width of the cardboard and rice paper case. B is the finished size of the cover, with the extension on the back. (To orient the viewer: 1 is the extended flap, 2 the back cover, 3 the spine with false bands, 4 the spaces for the French grooves, and 5 is the front cover.)
However, the leather on a book doesn't end at the edge of the cover. When measuring to cut, I had to allow an additional 2 or 3 centimeters on all sides to allow for the turn-in. So the final width of the cut leather was C.
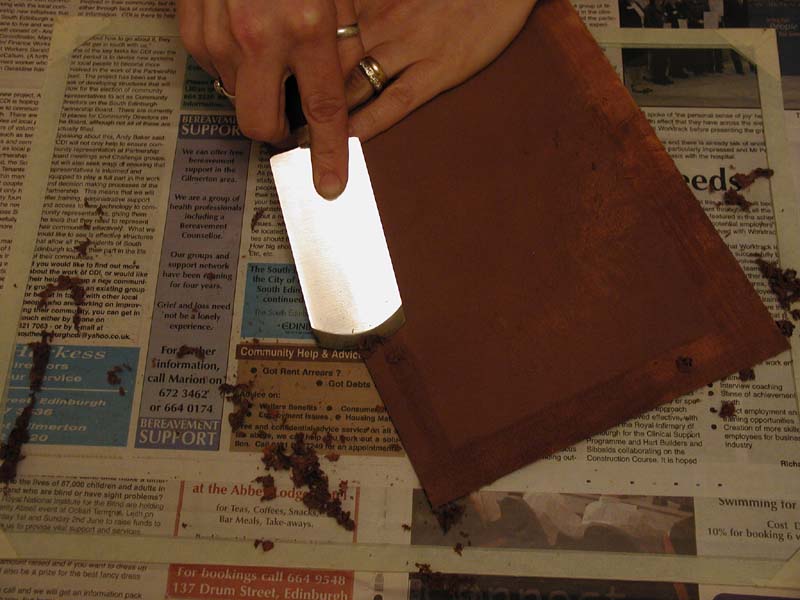 I cut the leather with a straightedge, making sure all the corners were square. I then roughed out the design on the flesh side of the leather, indicating where the French grooves and false bands were to be. Like most leather, the blue hide was too thick to bend round the covers evenly, or to lie flat over the false bands and French groove. It had to be skived along the spine and around the edges. (Skiving is the process of shaving leather thinner, using a paring knife or spokeshave.) In addition, I skived the entire flap that wraps round the front of the book.
2005: Many bookbinders shave their leather on used lithography stones. I haven't the space to store one, so I do my shaving on glass. The masking tape you see in the photo above indicates the edges of the sheet of glass.
Once the leather was shaven down, it was time to prepare the corners. I used my usual technique, even on the corners of the flap.
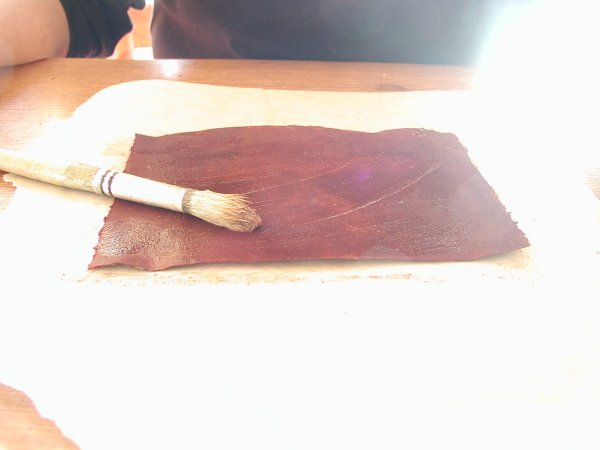 I then spread wheat paste on the flesh side of the leather. This step requires patience, because you've got to let the paste soak in for a while. It's a good idea to re-paste the leather at least three times, with a gap of ten or fifteen minutes between each application. It's best to fold the leather over in between pastings and go do something else.
2005: Some binders, rather than waiting and letting the moisture from the paste slowly soak through, dampen the outer surface of the leather before pasting up. This prevents the dry hide from soaking all the water from the paste, so the leather becomes soft and usable much faster. Choice of this technique does depend on whether the moisture will permanently mark the outer surface. Also, note that I use a much larger brush for applying paste now.
Once the leather was well-soaked with paste, and feeling buttery-soft, it was time to stick it to the case. I placed the rice paper and cardboard structure down on the leather and rubbed it down. Then I turned the edges in all around the leather cover. On three sides, the turns covered the boards and spine. On the extended, envelope cover, side, I slipped a leather thong into the turn-over before gluing it back on itself.
The leather was then in place. I turned the case over and began rubbing it to bring out the cover details. Using a pointed bone folder, I rubbed around the false bands and down the gaps for the French grooves. Leather needs patient and repeated rubbing to bring out the cover features, so this step tends to take a good half an hour. Note that for some leathers, care must be taken not to damage the surface finish.
 Once I had the outside of the book covered, I was still left with a stretch of pasted leather to deal with. Since the case only extended as far as the boards of the book, the envelope flap was still just a single layer of leather. I needed to line it with something. The logical choice, of course, was leather. I happened to have some tan leather that's a bit thin for normal bookbinding purposes. I cut a rectangle of it, wide enough to overlap the cover and fall 5 milimeters from the far edge of the flap, and once centimeter shorter than the finished boards of the book. I pasted it up and stuck it down, 5 milimeters in from all three edges, just overlapping the board.
The final step was to press the case, so that the leather would adhere to the boards and so that the corners would flatten properly. To do this, I slipped the book block inside the cover. First, I took the ribbon out of the pages. Then I wrapped the whole book in waxed paper to keep it from getting paste on it. I closed the case around it, and wrapped a sheet of waxed paper around the outside of the case. I laid the grooving rods in the French grooves, and taped the ends to hold them parallel. Then I slipped aluminium flashing in between the book and the case, up to where the grooving rods constricted things. Last of all, I added another book of the same thickness, fore edge to fore edge with the blue book, to flatten the envelope flap. I put the whole assembly in the book press for 24 hours.
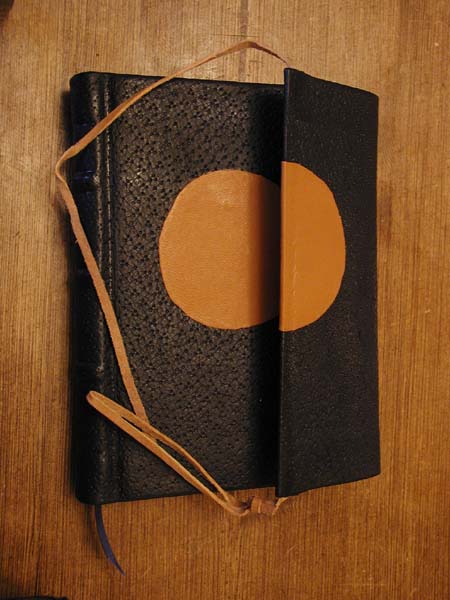 Once the book was pressed, I decided to add some of the tan leather to the front cover. I cut out a circle and glued it to the front cover with PVA. Then I cut another circle of the same size and laid it over the flap. I aligned it so that the circle would line up when the cover was closed, trimmed the excess, and glued it down as well.
| Go to Site Map | ||
|
|
|
 |
|
Click on a ribbon to follow a specific book |
||