Metal Book Press
 When my wooden press became warped out of all usefulness, I began investigating materials for a more permanent replacement. The standard choce for a home-made press is a hardwood such as oak or maple. But they are difficult to work with and expensive. Then a colleague suggested steel, and recommended a blacksmith who had done work for him in the past.
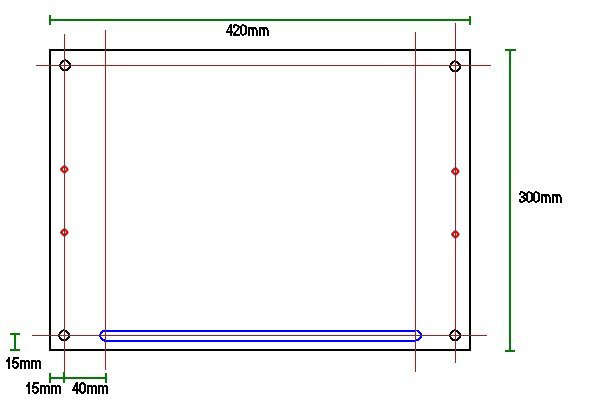
The blacksmith charged me Ł25 to make the plates from some 1cm thick steel they had in their yard. They had trouble cutting the sewing slot - even after I widened it in the design, they still made a very messy job of it. But the results were very satisfactory, particularly after I cleaned and painted it. It is heavy, so I don't move it around very often. (It's not actually a very good sewing frame, because it's so heavy.)
Materials Required
This list does not include any materials you will need to use your press as a sewing frame. Apart from the plates and handles, the hardware is the same as for the wooden press
- Metal plates
- They should be thick enough to be rigid (at least 1 cm), but thin enough that you can lift the top plate. See the cutting diagram below.
- Hardboard
- This will give the pressing surfaces smooth surfaces. You'll need enough to make two of the plates below.
- 2 threaded rods
- Get the thickest threaded rods that you can get hardware for (in my case, 12mm). My hardware store sells threaded rod in meter lengths, which can be cut down with a hacksaw (or a hacksaw blade on jigsaw - don't cut this way without eye protection)
- 4 wing nuts
- To fit your threaded rod
- 4 cap nuts
- These are like hex nuts with a smooth end that cups the end of the threaded rod.
- 8 washers
- To fit your threaded rod
- 2 metal handles
- These will allow you to lift the top layer easily
- 4 small bolts
- These should be small enough to fit through the handle screw holes and have flat heads, if possible.
- 4 small nuts
- Too fit the handle bolts above
- 4 washers
- Too fit the handle bolts above
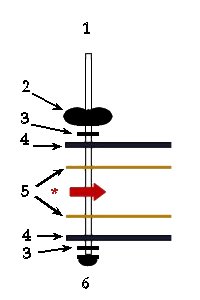
 Unlike for the wooden press, you can't glue the hardboard to the plates. Use the handle hardware to fasten them together instead.
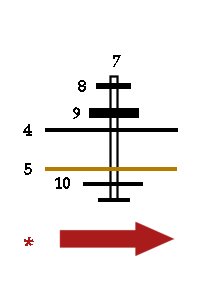
Assemble the hardware on the threaded rods and handles as below.
Threaded Rods |
Handles |
|
 |
 |
- Threaded rod
- Wing nut
- Washers
- Wooden plates
- Hardboard plates
- Cap nut
- Handle bolt (note that the head is down)
- Handle nut
- Handle
- Handle washer
|
* The red arrows indicate where the book goes in pressing.
Lessons Learned in Construction
The press I made didn't have handles. I was used to lifting the top plate of my wooden press with my fingers, but the steel was too heavy for that. Not being able to drill for handles, I added webbing straps to serve instead, tightened on with adjustment buckles. The straps go round the top piece of hardboard as well as the metal, so that they pick up the entire top layer at once. They are in the press area, but too far to the side to interfere with most pressing jobs (if I do something very large, I remove them).
The plan includes holes for bolting on handles; if installing them, make sure the bolt goes through the hardboard as well as the metal. That way, all the layers of the top plate will lift at once. The head should be inside the press and the nut on top of it, to minimise the thickness compressed in the press.
Since, unlike a "real" book press, the top plate doesn't stay up when lifted, you will probably need something to hold it open while you slip the book in. I borrowed a couple of wooden blocks from the children's toys. I lift one side of the press, slip the block in under the handle area, then lift the other side and put the other block in.
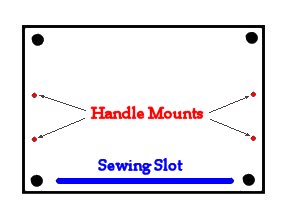
Although I made a sewing slot in this press, I find that it's my least favorite sewing solution. I would recommend that you not use it as one unless you have no other alternative.
 When my wooden press became warped out of all usefulness, I began investigating materials for a more permanent replacement. The standard choce for a home-made press is a hardwood such as oak or maple. But they are difficult to work with and expensive. Then a colleague suggested steel, and recommended a blacksmith who had done work for him in the past.