This is more of a theoretical discussion of how to curve the Half-Hitch Millipede stitch than a step-by-step instruction. If you can grasp the theory, then the practice is easier to just do than to learn by rote. (Besides, the way the body of the millipede covers some of the holes makes it impossible to photograph clearly.)
I would suggest trying it on cardboard before trying it on a book. Keep the thread somewhat loose as you rethread stitches turning the corner, because the half-hitches will pull them off the straight line. And don't forget to link each segment to the one before as described in the millipede instructions.
The trick to this stitch is to look at the same holes in two different ways. On the one hand, the holes are grouped by the signatures they pierce. On the other hand, they can also be considered by the body segment that they define. In an ordinary straight millipede stitch, these two mental models line up, because there's one body segment in between each signature and the next.
That's not the same in turning the stitch.
 The holes to the left are grouped by signature. As you can see, they are all in pairs, with two pairs of holes in all but the bottom most signature. That has only one pair, and will define the extreme end of the curve.
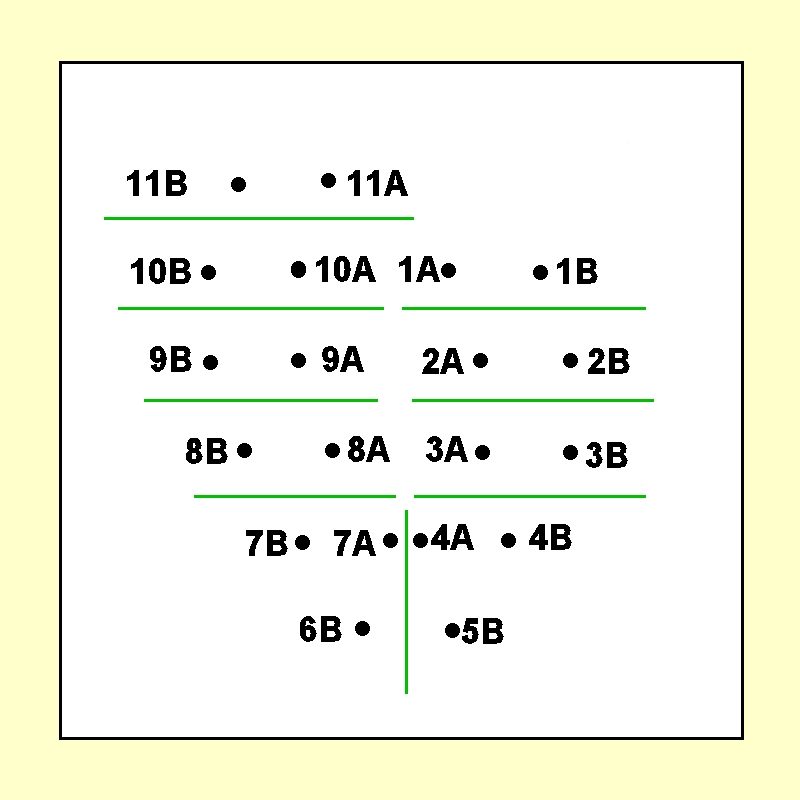 Here are the same holes, grouped by the body segments they will define. Note how the holes in the lower signature are now split up from one another, and grouped with the ones in the next signature up. Basically, these will be segments with an extra leg emerging in the middle. It sounds funnier than it looks.
Stitch all of the head of the Half-Hitch Millipede. (You'll note, in the diagrams of the holes above, that the hole 5B does exist, though its partner in signature terms is 6B.)
With the thread coming out of 4B, form the body segment between rows 2 and 3. Then thread it back into hole 7A. You'll note in the diagrams, that you're intended to turn the work as you turn the corner. The "B" column of holes runs all the way along the outside of the curve, meaning that if the work is in the original position, 7A is to the left.
Pull the thread that went into 5B out of 6B (you'll note that they are on the same signature). Use the standard Millipede process to form the segment between rows 3 and 4, being sure you've captured the thread from the previous step in the knot. Thread the end back into hole 8B. (Note that this is the only time in any Millipede sewing where a thread comes out of and goes into a hole with the same letter.)
Bring the thread from step 2 out of 7B. Form the body segment after 4A and 4B. Be sure to catch the thread from the previous step in the segment. Don't thread it back into the work.
Now it gets funky. Reset the twist on the body by passing the thread behind the work in the natural direction of travel (right to left if you're like me). Then form a segment after 4A and 5B. Thread the end back into the work at 9A. You've just created either a long segment with a spare leg sticking out, or two short segments with one leg missing.
Now we do it again. Out of 8A, form a segment after 6B and 7A, then reset the twist by passing the thread behind the work. Form another segment between rows 7 and 8. Thread back in at 10B
After that, you're back to a normal millipede.