| Go to Site Map | ||

|

|
|
|
Click on a ribbon to follow a specific book |
||
| Go to Site Map | ||
|
|
|
|
|
Click on a ribbon to follow a specific book |
||
This step was performed on the red book.
I wanted to try something unusual with this book: bands on the covers as well as on the spine. This would require some preparation of the boards as well as the leather.
 My design involved extending the bands from the spine across the front and back covers. The basic shape was a capital "E", with the top and bottom lines curved away from the center. To acheive this effect, I used PVA to glue leather strips on the cover following the "E" shape. The PVA took very little time to dry, so I was able to do this just before cutting out the leather.
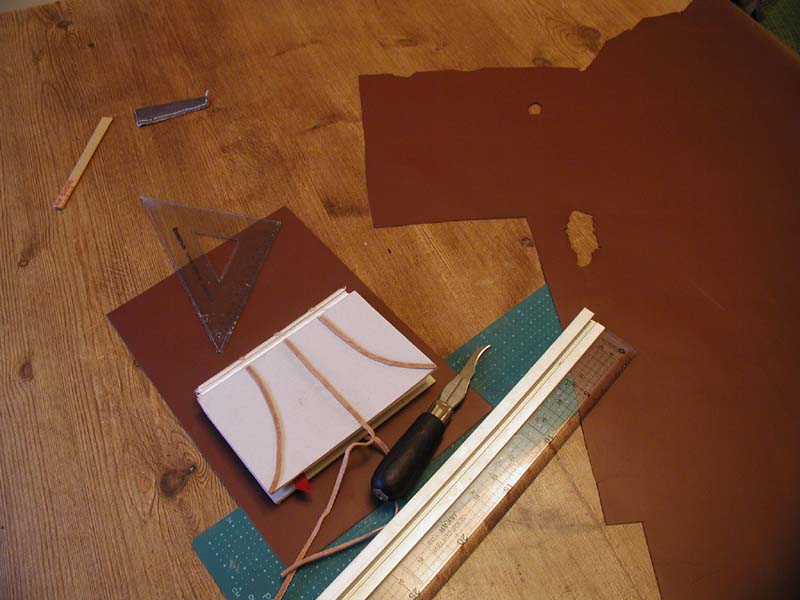
I chose a red-brown leather that I had used before. It's a beautiful shade, and a pleasant texture, but the color is not fast. Every time I've bound with it, I've managed to stain the pages of the book block. I decided to risk it, and cut the leather to size. To do this when casing in is easy, because you have the cover ready to lie flat on the leather. However, a book on split boards isn't that much harder. I needed a piece of leather about 4 centimeters taller than the book, and 4 centimeters wider than the width of the covers plus the spine plus the French grooves.
Rather than calculate all that out, I used a tape measure from my sewing kit. If you don't have one, just use a strip of paper. Wrap it round the book from the fore edge of one cover to the fore edge of the other. Mark the locations of the edges of the boards and of the French grooves. Unwrap it, then add 2 centimeters onto the end markings. (The 2 centimeters will make up the turn-ins where the leather wraps round the cardboard.)
I cut the leather with a straightedge, making sure all the corners were square. I then roughed out the design on the flesh side of the leather, indicting where the French grooves and false bands were to be. Like most leather, the red hide was too thick to bend round the covers evenly, or to lie flat over the false bands and French groove. It had to be skived along the spine, around the edges, and along the paths of the bands on the covers. (Skiving is the process of shaving leather thinner, using a paring knife or spokeshave.)
2005: Many bookbinders shave their leather on used lithography stones. I haven't the space to store one, so I do my shaving on glass. The masking tape you see in the photo above indicates the edges of the sheet of glass.
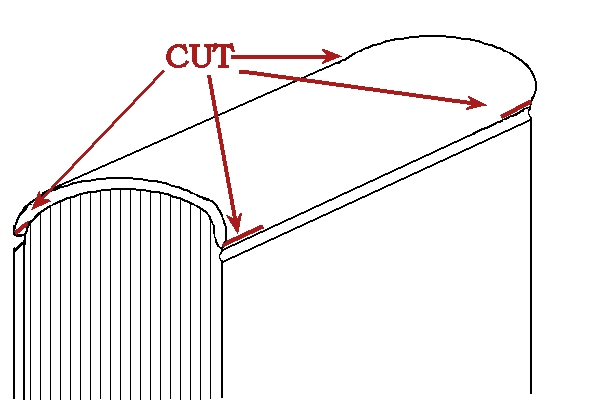
 Marking before skiving the red book. The diagram shows where to shave the leather. The grey areas should be shaved thin, particularly at the edges. Note the arched shape on the spine, intended to prevent a sharp line between the skived and unskived leather.
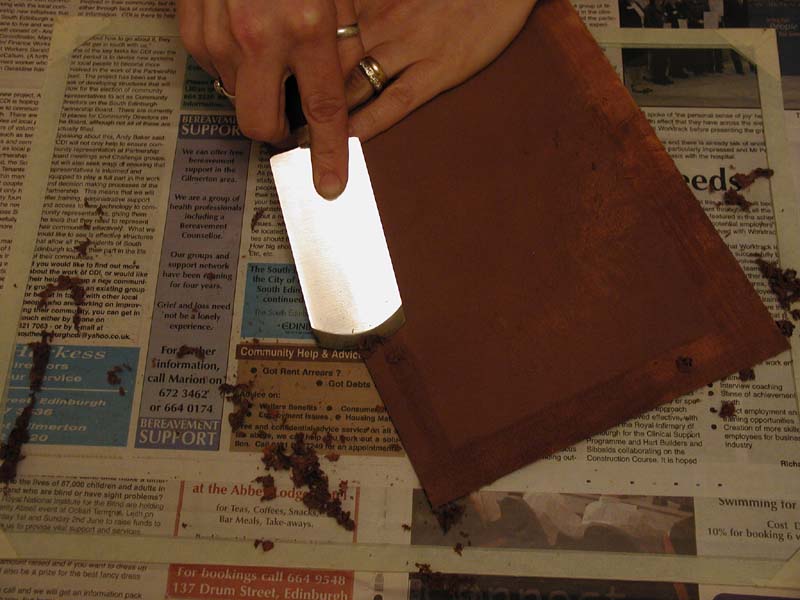 Skiving the leather for another book. Note the shallow angle of the knife. The masking tape around the edges of the picture marks the edges of the glass sheet used for skiving.
 Once the leather was shaven down, it was time to prepare the corners. I used my usual technique. Then I spread wheat paste on the flesh side of the leather. This step requires patience, because you've got to let the paste soak in for a while. It's a good idea to re-paste the leather at least three times, with a gap of ten or fifteen minutes between each application. It's best to fold the leather over in between pastings and go do something else.
2005: Some binders, rather than waiting and letting the moisture from the paste slowly soak through, dampen the outer surface of the leather before pasting up. This prevents the dry hide from soaking all the water from the paste, so the leather becomes soft and usable much faster. Choice of this technique does depend on whether the moisture will permanently mark the outer surface. Also, note that I use a much larger brush for applying paste now.
 One thing I did while I was waiting was to prepare the book block for the leather. I protected the ribbon by tucking it into the book, then tucking its end back in among the pages. Then I cut 1 centimeter slits into all four corners of the hollow back, to allow the leather to turn in at the spine.
Once the leather was well-soaked with paste, and feeling buttery-soft, it was time to stick it to the book. This is the finicky part of the process, and I used to end up covered in paste after doing it. (That's one reason I stopped covering books this way.) Needless to say, I was to busy wrestling with the book to photograph the process, so I'll have to describe it all in words.
First, I placed the book spine-down on the leather. Then I laid the back cover against the leather as well. The book was now face up in front of me, naked front cover facing me. Keeping a gentle tension on the leather, I pulled the left flap up and over the front cover. I used the palm of my hand to smooth it down, always rubbing toward the fore to feed the excess leather over the edge. Then I turned the book over and rubbed my palm over the back cover. Again, I always rubbed toward the fore, feeding the surplus leather over the edge.
2005: Always remove your rings before doing this. Having short nails is also an asset.
Once the leather was smooth on the covers, I started turning in the edges. Turning in the fore edges was easy - just fold the leather over the cardboard. The heads and tails of the boards were the same - fold over, rub a bit so the leather sticks, be done.
The spine was more of a challenge. The goal was to fold the leather over so it ended up inside the hollow back, folded over the double layer of stiff paper that I glued up when building the spine. I had to do this before the paste soaked and softened the paper, make sure the leather was flat inside the hollow back, and make sure the ends of the spine were even with the ends of the boards. It took lots of poking with the bone folder, and in the process I (once again) stained the ends of the pages.
2005: One way to prevent staining of the book block is to wrap it in waxed paper before starting to cover the book. And if you've trimmed the pages well enough, then you can often sand minor stains off of the edges.
One technique I have yet to perfect is shaving the leather thin enough at the ends of the spine. No matter how many times I have done it, there is always a perceptible raised band at the top and bottom of the spines of my books where the leather is doubled up. (Indeed, I started using false bands on my spines to balance this effect and make it seem intentional.)
The leather was finally in place. I turned the book over and began rubbing it to bring out the cover details. Using a pointed bone folder, I rubbed around the false bands and down the gaps for the French grooves. Leather needs patient and repeated rubbing to bring out the cover features, so this step tends to take a good half an hour. The red leather had to be rubbed with extra care, or the finish comes off.
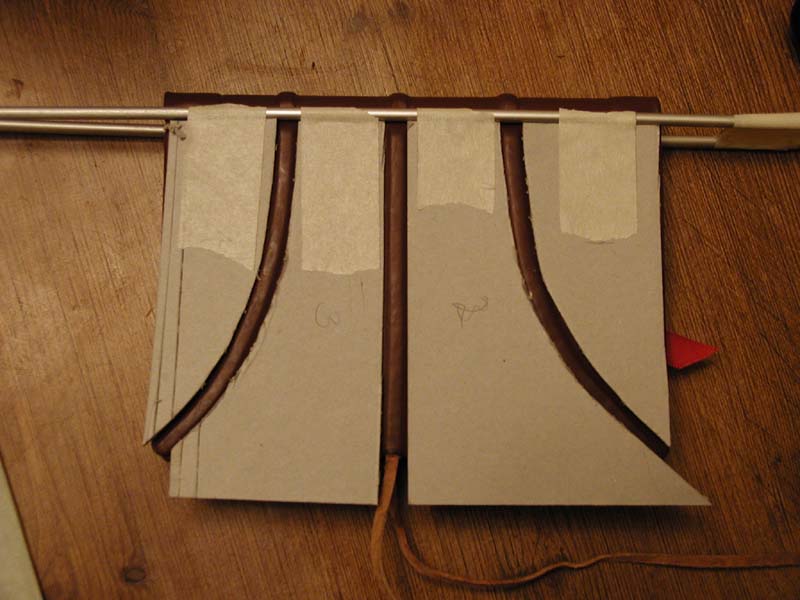 Finally, I packaged the book up to put it in the press. I removed the ribbon from the book block. Then I slipped aluminium flashing in between the covers and the book block (the flashing not only protects the book block from moisture, but also presses the corners very flat). I put waxed paper in between the flashing and the covers. For this book, I had to make fitted pressing boards to keep the bands on the covers from getting crushed. I cut cardboard pieces to fit the spaces between the bands and taped them to the grooving rods. Then I laid the grooving rods into the French grooves and taped their ends together. I put the whole thing into the book press and left it for 24 hours.
| Go to Site Map | ||
|
|
 |
|
|
Click on a ribbon to follow a specific book |
||